My relief and intaglio printmaking over the last couple of years has been completed on the Xcut Xpress – a device originally designed for craft die-cutting, but having gained a cult following with users adapting it to printmaking use. It was wonderful for this use and served me well, but there was one limitation to it; the maximum size of the paper on the short edge was limited to 8″. So, if you wanted to leave a border around the image (as is usually the case) then an image could really be 6″ x any length. I have made made larger prints but they were hand burnished, and that is a lot of work that has led to many people having repeated stress injuries. I discovered homemade bottle-jack presses quite a while ago but never intended to make one since I also wanted to produce intaglio prints (drypoint, photogravure, etc), and nowhere did I see anyone making such prints with them. The main reason being that there was not enough pressure to push the paper into the matrix to pick up the ink. Most people were making these presses using jacks that ranged from 2 to 6 tons. I decided that I could make one using a 12-ton jack with the belief that it surely would do the job… IF the framework could take the strain!
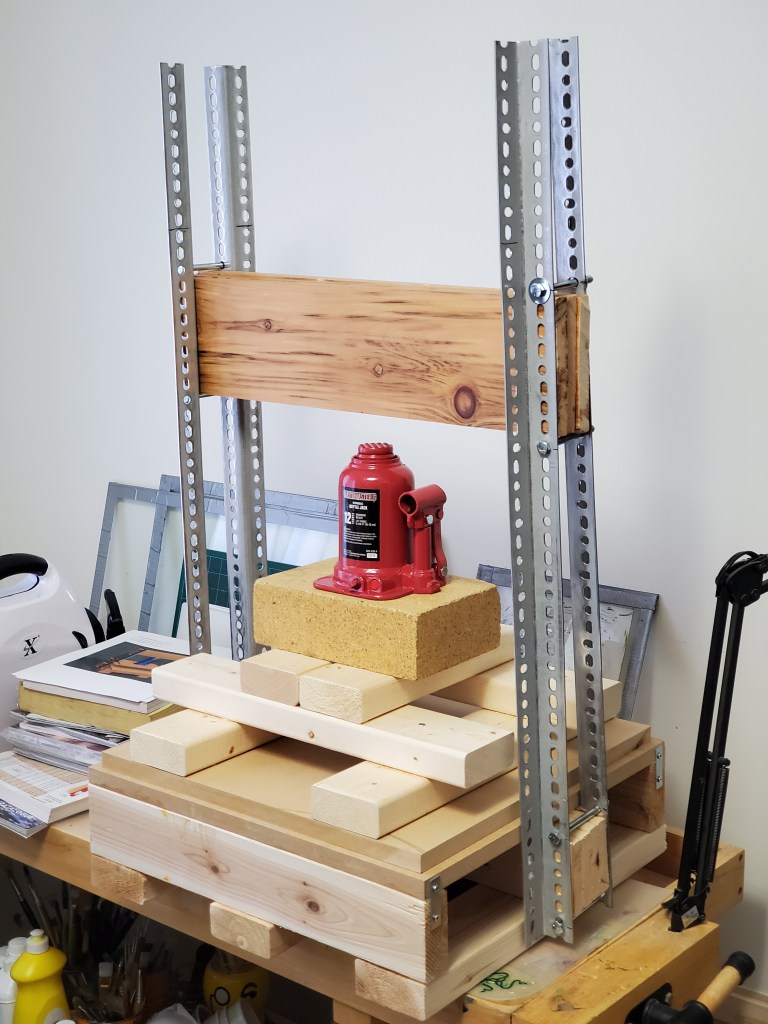
And so here is the finished result! Made out of 2×4’s, 1×6’s, and MDF boards, with steel angle iron. Most designs I saw online had the jack sitting on top of a single board. This, to me, was not an ideal way to distribute pressure across a large piece of paper. Hence you will see that sort of pyramid shape under the press which distributes pressure more evenly. Not really necessary, but because I had it handy, there is a really heavy fire-brick under the jack to sit on.
So, did it work for intaglio-type printing? After a few trial prints I can say absolutely yes. I’ve only printed an 8″x6″ so far, but it worked. On top of the printing paper I placed a 3mm thick piece of Eva foam (medium hardness – it has to give) and this gets compressed very tightly down onto the paper pushing it right into all those tiny grooves. The press frame creaks and groans but has held up so far. I will have to add a piece of metal to the top brace since I have bent two thin pieces of metal placed under the bolts!
See next post for print result.

Well done Glen ….what a great achievement!!!. I so admire people who do this sort of thing !!! What will be the largest print you will be able to print on it? Lovely watercolour drypoint by the way. I was actually thinking it would be good if I could see the border paper and the emboss plate mark, sort of thing. Would it be possible to do a timed photo of you or another person holding the print in their hands in front of their face. I was just thinking that getting a sense of it being an “original print” is important as opposed to a flat screen image. anyway bye for now . Aine
Thanks, yes, I always struggle with trying to capture that aspect of it. Definitely will try something once printed on larger paper. As far as the max size goes, well the bed is 19″ wide but I suspect the largest relief print (not intaglio) would be about 16″ wide with paper at 18″. The other direction could be larger, especially if a “double” printing could successfully be completed – you know, put one half in and then the other half. Careful registration would be needed, of course.
Aine, here is a video I posted not long ago of the print on larger paper. Not coloured yet. If you look closely you can just make out the embossed edge as I move the camera back. Could be better, I know, and I will try another once coloured. https://www.facebook.com/groups/1071143236306973/?multi_permalinks=2765936943494252¬if_id=1574092791434626¬if_t=feedback_reaction_generic